Showing posts with label SAP FIORI APP ACTIVATION. Show all posts

Tuesday, 13 October 2020

SAP FIORI Launchpad Customization : Custom Logo and Background image

In this tutorial we will learn how to customize FIORI Launchpad login page. We can add custom and user defined background image and logo through custom ABAP class. 


In order to upload the custom image to SAP system and replace the default logon page SAP image follow the below mentioned steps. 
  • Go to transaction SE80.
  • Click on MIME repository.
  • Navigate to image using path - Sap > public > bc > ui2 > logon > image. 
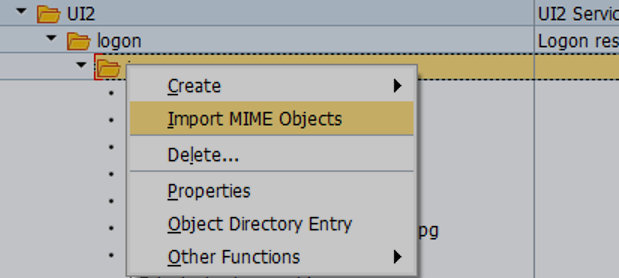
  • Right click on Image folder and click on “Import MIME objects”
  • Import the image that you want to put as logo in the Launchpad login page.


Imported images will be added to the images node. 

Once images are uploaded create a custom class "ZCL_SRA_LOGIN" which is copy of standard class /UI2/CL_SRA_LOGIN. 

Inside method INIT_DEFAULT_PROPERTIES make changes in the code and below mentioned properties "img_background", "img_background_mobile" and "img_background_mobile_land" so that it points to images we have uploaded in the mime repository. 

set_property( iv_name = 'img_background' iv_value = '/sap/public/bc/ui2/logon/img/custom_login.jpg').
set_property( iv_name = 'img_background_mobile' iv_value = '/sap/public/bc/ui2/logon/img/custom_login_mobile.jpg').
set_property( iv_name = 'img_background_mobile_land' iv_value = '/sap/public/bc/ui2/logon/img/custom_logo.jpg').

  • Now go to SICF transaction and navigate to default_host > sap > bc > ui5_ui5 > ui2 > ushell
  • Under Error Pages tab click on Configuration Button at the bottom of the screen and change the ABAP class to ZCL_SRA_LOGIN and maintain the client as well. After making the changes, close the pop up by clicking on the tick icon and save the changes by clicking on save button.


Similarly Go to SICF transaction. Follow the path as mentioned below: 

default_host > sap > bc > flp. 

  • Under Error Pages tab choose the System logon radio button instead of the default Explicit Response Time Radio button. 
  • Click on configuration button and make the following changes in the pop up. Maintain the Z class name "ZCL_SRA_LOGIN" here as well.


We can see the custom logo at the bottom coming through custom class.


Wednesday, 7 October 2020

Folder Structure SAP UI5 application

Folder structure for SAP UI5 application should contain index.html, manifest.json and Component.js file in the root folder.


Cannot Load Metadata for Service /sap/opu/odata/sap/service_name

While working with SAP UI5 and FIORI applications, we generally encounter error "Service failed. Contact your system administrator" or "Cannot call service with URL /sap/opu/odata/sap/service_name". These types of errors generally occurs when the authorization object is missing for the user in the backend server.

To resolve these issues, log on to the backend server and assign the S_RFCACL missing authorization object for the end user.

Tuesday, 6 October 2020

Clear Cache : FIORI APPS

While implementing SAP UI5/FIORI applications, we should always clear the cache before testing the changes i the browser. There is persistence layer in the FIORI and UI5 applications that uses the caching mechanism.

We have transaction codes to clear the cache on frontend and as well as backend servers. Also we can run the reports to synchronization chip cache on frontend.

Transaction codes to clear the Metadata cache

  • /IWFND/CACHE_CLEANUP - Transaction code to clear cache on frontend server.
  • /IWBEP/CACHE_CLEANUP - Transaction code to clear cache on backend server.

Reports to Synchronize Chip Cache
  • /UI2/CHIP_SYNCHRONIZE_CACHE
  • /UI2/DELETE_CACHE_AFTER_IMP
  • /UI2/DELETE_CACHE

Saturday, 3 October 2020

Could Not Open App | SAP FIORI Troubleshooting

When we log on to Fiori Launchpad and access any application we get error message in the pop up saying "Could Not Open App".


Now open the browser "Developer Tools" to check the error details. How to open Developer Tools - Right click on the browser window and click on "inspect". 


Check the Network and console section of developer tools to view the error details. In console window you will find error "Failed to load Component.js from /sap/bc/ui5_ui5/sap/app_name/Component.js" 

 This type of error generally occurs when SICF node is not activated. How to Activate the UI5 application SICF node?

  • Open transaction code SICF
  • In the service name field give the BSP application name and press enter. 
  • If application name is grayed out in the list under ui5_ui5 node then right click on the application name and click on activate to activate the application.


Wednesday, 1 August 2018

Metadata not loaded Error SAP FIORI App Activation


Metadata not loaded – See /IWBEP/ERROR_LOG in backend. Metadata call for model was not successful


There might be situation where user is not able to add service from Maintain and Activate service transaction /IWFND/MIANT_SERVICE due to unsuccessful Metadata call for model. This error occurs when search object connector component is missing in the backend server, to resolve this error we need to create the connector component.

To create the connector component open Connector Administration Cockpit using transaction ESH_COCKPIT and press create button to create connector.


It will open up create search object connector pop up, Choose EAPPLH from the Software Component dropdown menu.


Now select the connector model for which you want to create the connector. Check for connector model name from implementation information section in Fiori App Library.


Give the search model name in input box and click on Create Connector button to create connector.


Check for activate status for the connector once it is created and add the service again in Maintain and Activate Service Transaction  

Activation of Fiori Fact Sheet Application part II


Steps to activate OData Service

Step 6: Go to Activate and Maintain Service transaction /n/IWFND/MAINT_SERVICE and click on Add Service button to add the service.


Step 7: Enter system alias and technical service name to add and activate the service.


Search for OData service in the Fiori App Library.


Step 8: Click on ICF node button to activate the selected service.


Step 9: Activate the ICF node of the service. Search for ICF node details in the Fiori App Library under implementation information.

To activate service in backend, go to SICF transaction and give the service name and press execute button or follow the ICF node path given in app implementation information section.


Now, Right click on the service and choose activate.


Finally, Assign Roles to user

Step 10: Search for roles from implementation information in Fiori App Library to give users access to the app in the SAP Fiori Launchpad.


To assign roles to user open transaction SU01 and enter user id and press execute button.


It will open up the maintain user screen, click on Roles tab and add the roles that was there in Fiori App library and save the user details.


Step 11: We have successfully completed all the steps required to configure and activate the FIORI Fact Sheet Application. Now, open the Fiori Launchpad to check for the application!!

Activation of Fiori Fact Sheet Application Part I

Steps to Activate SAP FIORI Fact Sheet Application

Step 1: Check Import Log of Software Component. Use transaction code ESH_COCKPIT to access the activity.

Step 2: To activate the Fact Sheet application we need to activate the search connectors in the back-end systems.

Now each application has specific search connector associated with it, to find the search connector go to Fiori App Library. Use below link to access the Fiori App Library
Select All Apps from the Categories as highlighted below.


Search and select application “Network Activity” and expand configuration under implementation information.


Under configuration search for Search Connector software component to activate it in backend.


Activate Search Connector component in Backend

Step 3: This will open up the Connector Administrator Cockpit screen which can help you monitor and administrate search object connectors.

Click on Modeler Link.


Step 4: Now, Select the Search Connector “SAPAPPLH” and then choose Import Log (Transport) from Actions dropdown button.


Step 5: Go to transaction SM37 to check if search connector is imported successfully


In the next blog Activation of Fiori Fact Sheet Application Part II, we will explain how to activate the OData Service and associated ICF nodes.